14

Visit now: http://stackcenter.quickmediasolutions.com/beta/

Feedback is appreciated!
alt text

About

StackCenter 2 has been brewing for quite some time now. Since the global inbox was introduced, the original StackCenter was rendered mostly useless and the need for a replacement was born.

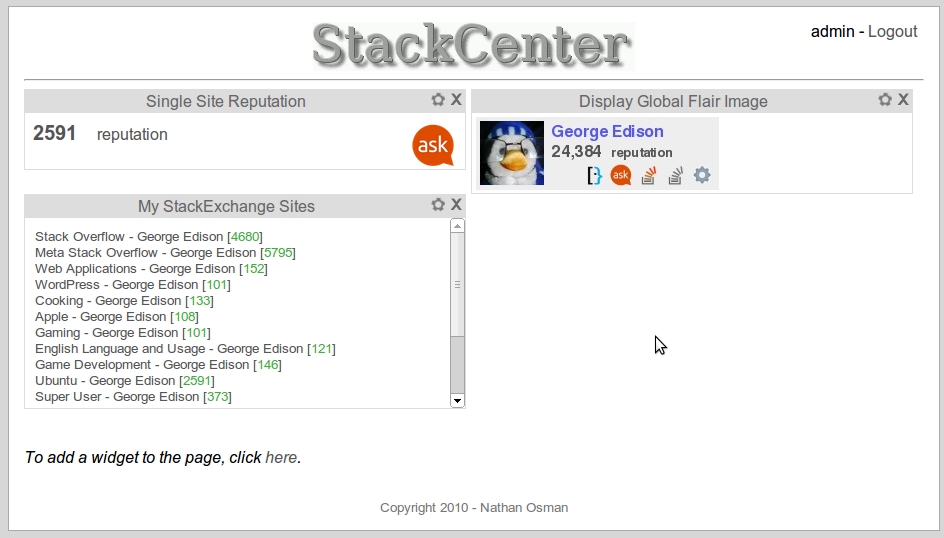
And now, I present StackCenter 2! Its goal is to be a dashboard for everything StackExchange such as rep. graphs, images, or whatever! Currently, there are 3 widgets and it is now possible to write your own - just follow the link on your dashboard's home page.

After registering, simply click on the 'add widgets...' link to get started. Some things might not work quite right. (This is in beta after all.)

Any feedback you can provide is welcome!

License

Closed source at this point.

Platform

StackCenter should run fine on any web browser that has JavaScript enabled. (StackCenter 2 uses a lot of JavaScript.)

Contact

Email: [email protected]

Code

PHP (using the CakePHP framework), JavaScript, and of course, HTML

9
  • 1
    How about some screenshots?
    – swanson
    Dec 4, 2010 at 1:54
  • @swanson: There. I added one. Dec 4, 2010 at 3:29
  • @George +1 you should add some "how to create a new widget" instructions, with HTML and Js code. Dec 5, 2010 at 13:28
  • 2
    @sys: I have added a couple of tutorials now to help get people started. Dec 5, 2010 at 21:33
  • @George, what's the key thing needed to make the widgets? And how do the wf_ functions work?
    – Jonathan.
    Feb 23, 2011 at 19:01
  • @Jonathan: The answers below will hopefully explain how the wf_ functions work. What do you mean by the 'key thing'? Feb 23, 2011 at 21:07
  • In this function wf_getUserGUID(key); what is key? And what is the user's GUID? Their association ID? There is no answer how to get data from the API.
    – Jonathan.
    Feb 23, 2011 at 21:11
  • @Jonathan: Sorry for the confusion. key is a special string value passed to you and available in a variable called... key. Simply use key wherever it asks for a key. The user's GUID is their association ID. Feb 24, 2011 at 0:51
  • @Jonathan: To get data from the API, you can use the wf_makeAPIRequest() function. More details on this page. Feb 24, 2011 at 0:52

3 Answers 3

3

Introduction to writing widgets:

Writing a widget is very simple and I'll begin by describing a simple example below.

  1. Start by logging in to your account or registering if you don't have one.
  2. Click the link at the bottom of your page that says "To design a widget, click here."
  3. Enter the details of your widget, such as its name and title. For our example we'll use:
    Name: helloworld
    Title: Hello World Widget
    Description: The Hello World widget demonstrates the process of writing a widget for StackCenter.
  4. Now for the HTML and JS code... we'll start by creating a small DIV in the widget like this:

    <div id='helloworld_main_div'><i>Loading...</i></div>
    
  5. The next step is to write the JS code that will be run when the widget is initialized. The code for our example will change the text of the DIV to 'Hello World!'. We will be using jQuery for this.

    // Set the text of the DIV
    $('#helloworld_main_div').html('Hello World!');
    
  6. And that's it! Click the 'Submit Widget' button to submit your widget and you will be able to add it to your home page.

In a later tutorial, I will explain some of the wf_* functions that your code can call to interact with the environment.

3

Using the wf_* functions in your code:

Although the first example described the basic process of creating a widget and what is involved, I didn't go into any detail on how the widgets can interact with the environment.

When your code is invoked, it is provided with a special variable 'key' that you will need to pass to all of the functions that you will use.

In order to make this as clear as possible, I'll create another example - this one that displays the user's global flair image given their GUID (which can easily be retrieved):

  1. Create a new widget and use the HTML code from the previous tutorial.
  2. Start with the following JS code:

    // Remember that this section of code is passed a parameter
    // 'key' that we will need for the wf_* functions.
    
    // Get the user's GUID
    var user_guid = wf_getUserGUID(key);
    
    // Now construct the URL of the image we will display in the widget
    var image_url =
        'http://stackimage.quickmediasolutions.com/global.php?guid='
        + user_guid;
    
    // Set the contents of the DIV to the image
    $('#' + wf_getRootDiv(key)).html('<img src="' + image_url + '" />');
    
  3. Now try it out - you will see your global flair appear in the widget.

That was pretty easy - once again, notice that each of the wf_* functions require your 'key' in order to work. The wf_getUserGUID function returns the association ID of the user. (This is derived from the information the user supplies when registering.) The wf_getRootDiv function returns the id of the widget's DIV. That is the DIV where your widget's content should go.

In a later tutorial, I will describe how the settings dialog and code work as well as the wf_readSetting and wf_writeSetting functions. Also, I will explain the wf_makeAPIRequest function.

1
1

Bug Report


When I click on the options click change the widgets settings I have to resize the box so I can see the optons.

Things to add


With the login have a glogal login so that you can go on Stack Image and you don't have to type your ID Numbers.

2
  • 1
    Regarding the bug, what browser are you using? Can you include a screenshot? Mar 6, 2011 at 20:44
  • @George IE8, Windows XP SP3.
    – Benny
    Mar 8, 2011 at 5:57

You must log in to answer this question.

Not the answer you're looking for? Browse other questions tagged .